Wood Inlay
By the Chicago Park District
MODERN RECREATION SERIES
Click here see
the original images of this book.
This book, like all others in this series, contains material
adaptable to the uses of the recreational groups in the Chicago
Park District. It is designed primarily as an instruction manual
and reference book for those groups. It records for present and
future use in the Chicago Parks the accumulated experience of
many groups and professional workers. Besides serving the
foregoing purposes, this book and the others of the series form a
medium through which the advantages offered in the park system
can be extended to the home and to other communities. These books
are being developed in part through co-operation of the Works
Progress Administration.
Copyright 1937---Chicago Park District
Wood INLAY as a craft dates back to the
Pharaohs
In its earlier form, known as intarsia, buildings or ruins of
buildings in elaborate perspective were depicted in wood,
tortoise shell and mother-or-pearl. Later, in the 16th and 17th
centuries, the art flourished in Holland, France and Italy and a
distinction was introduced between inlay and marquetry, which
together were known as intarsia. In true inlay work the design is
routed out in a matrix of one material and a piece of different
and contrasting material is fitted into the depression.
Marquetry, on the other hand, is an artistic matching of numerous
small pieces of veneer to form a design or picture. These pieces
are then assembled after the manner of a jigsaw puzzle and glued
to a heavier matrix or supporting piece.
Because the worker was hampered by lack of proper tools, inlay
work was for a long time considered very difficult and was, for
this reason, generally not done by amateurs. Today, with the aid
of modern shop equipment, the work no longer presents unusual
difficulties and the ancient craft is once more gaining in
popularity as a recreational activity.
In the following discussion, detailed step-by-step
instructions take the reader through a series of wood inlay and
marquetry projects, starting with very simple designs in
marquetry and progressing to more advanced projects. After that,
true inlay, inlay turning and related subjects will be discussed.
Every effort has been made to keep this guide to the craft clear
enough for the beginning worker and at the same time to make it
complete enough so that the advanced craftsman may find benefit
and recreation by following it.
Fundamentals of
Marquetry
 |
An INEXPENSIVE little plaque, Figure 1, is chosen for
the first project, since it incorporates elementary
processes of marquetry. If you follow the instructions
and drawings step by step, you will have no difficulty in
completing a well-finished, attractive plaque. The first
step consists or laying out on paper a full size drawing
as in Figure 2, ruling in horizontal and vertical guide
lines 1/2 in. apart. Drawing and finished plaque should
be 5-1/2 in. by 6-1/2 in. Over all with an inner panel
3-1/4 in. by 4-1/4 in. Copy the picture square by square.
Once laid out on paper, the design may be transferred
directly to the workbench or board on which the marquetry
is to be assembled; or the paper itself may be used. The
plaque calls for three shades of wood -a light colored
wood such as maple for the center design, a dark wood
like walnut for the background and the wide outer border
and a medium dark contrasting wood such as birch for the
wide intermediate border. The thin strips of light and
dark border may be made up of the first two woods. The
woods selected may vary widely in color and grain as long
as they furnish contrast.
|
| Once procured, the veneer must be cut to approximate
size. Thin veneers may be roughly cut with ordinary
scissors and later trimmed to exact size by saw or plane.
Never cut pieces to the exact size until you are ready to
fit them into place - this prevents the edges from
becoming marred or slivered in handling and storing. If
some of the veneers buckle up, as very thin wood
sometimes does, moisten the pieces, place them between
papers and put them in the press, Figure 14, for a few
hours. Veneers also split very easily; on light colored
woods these cracks show up very plainly, but on the dark
colored woods they disappear after the pieces are glued. In
an object such as the small plaque we are making where
one piece of wood fits into another, we always cut out
both pieces at the same time to assure a perfect fit.
Trace the figure of the little girl on the light colored
panel, then lay this panel on your darker piece of wood,
making sure that the grain in both pieces runs in the
same direction, for this will facilitate sanding later.
To prevent the two panels from slipping while they are
being sawed, hold them firmly together by gluing paper
tape around edges as in Figure 3.
|
 |
 |
Now you are ready for sawing with the coping saw.
Drill a very small hole into the design, Just large
enough for the saw blade to pass through. Select an
inconspicuous part of the design and drill the hole
exactly on the line to be sawed. By all means do not
drill the hole a distance away from the line as you would
do in ordinary fretwork, because the extra saw cut made
thereby would be very, noticeable and objectionable in
the finished work. In using the coping saw, thread the
blade through the small hole with its teeth pointing
downward. This sawing must be done very carefully or your
plaque will be unsightly. For marquetry work, very fine
blades should be used, because the narrower the kerf the
closer the fit of the pieces. Coping saw blades are
manufactured so thin that the teeth are often hardly
visible. Such blades are necessary, however, only in
advanced work; for ordinary work a stronger blade may be
used. Generally a blade 0.010 in. thick, 0.025 in. wide,
with 21 teeth to the inch, will be found quite
satisfactory. |
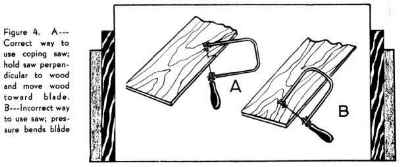
| Several important points about the use of the coping
saw must be remembered. Always hold the saw glade
straight up and down as in Figure 4A; if it is held on a
slant, as in Figure 4B, the sawed parts may not match
properly later on. Also never press forward on the saw as
in Figure 4B, because that will bend the blade and
eventually snap It. Do not follow the lines of the design
with the saw; instead, move the saw steadily up and down
in one place and in one direction and maneuver the work
so as to move the design toward the saw. When doing
fretwork of any kind, it is customary to rest the wood on
a sawboard -a piece of wood, Figure 5, with a triangular
notch in the end of it through which the saw is
manipulated. Since inlay work calls for many small pieces
and the thin veneer is easily split if not given the
proper support, it is advisable to make a special saw
board for this work, having a very narrow but deep slot,
which provides a good bearing surface all around as in
Figure 5B. |
|
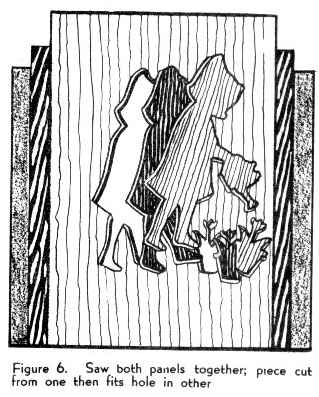
| Continue sawing around the design until it is freed
from its background. The figure which drops out of the
light panel will then fit into the opening left in the
dark one; at the same time there will be a figure from
the dark panel that will fit equally well into the light
one. See Figure 6. This extra set of panels may be used
to make up another plaque with reverse color
combinations. Now lay your pieces aside very carefully,
taking particular pains to preserve any tiny slivers that
might have broken off in sawing. Then scrape the paper
tape from the edges of the veneer, taking care not to dig
in or tear the thin veneers. Now separate the two panels. The
next step, assembly, should be done directly on the
working drawing either on your workbench or on the paper
drawing on a board. Lay the dark background in its proper
place on the drawing and tack it in place with two very
fine brads, driving them in just far enough to hold the
piece in place. Press the little girl's figure into the
opening in the background but do not tack it because the
nail holes would be very noticeable in the light colored
wood. Instead, place a place of gummed tape across the
design to hold it in place.
|
 |
 |
Now proceed with the thin alternate colored border or
banding. This border is made of separate pieces put in
place one after the other. Cut the strips the proper
width and a little longer than the drawing indicates. It
is better to saw them than to slice them with a knife
because a knife tends to follow the grain of the wood and
swerve from the straight edge. If a knife is used,
however, it must be razor sharp and should be drawn along
the straight edge vary lightly on the first stroke. The
line scored by this first stroke will now serve as a
guide and the second stroke may be heavy enough to cut
through the veneer. Place the first strip against the
side of the panel just laid out, and with a chisel or
sharp knife cut off the ends at an angle conforming to
the miter marks on the drawing, as in Figure 7. Take
extreme care in cutting these miter corners, because
further trimming would make them too short. |
Handling The Different
Strips
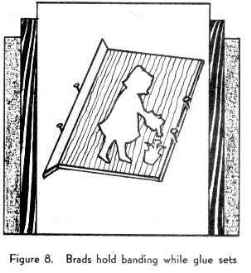
| When the strip has been correctly trimmed, place a
few specks of glue on its inner edge and press it against
the censor panel. Drive two thin brads immediately behind
the strip to hold it firmly against the other part until
the glue is set, see Figure 8, Repeat the foregoing
operations with the second, third and fourth strips until
the first part of the band has been placed around the
center panel. When this is accomplished, the glue in the
first joint will have set sufficiently to allow the
removal of the brads and the second border band or
contrasting color may be put in place and glued in the
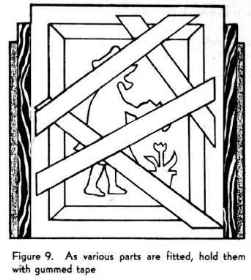
same manner as the first. When the last narrow band has
been placed and glued, paste gummed taps over the
completed part, Figure 9, to hold everything in place so
that you can take out the brads. You are now ready to
work on the next 7/16-in. portion of the border. Because
of the width of this piece. You had better not cut the
miter angles with a knife or chisel since the cut would
probably be inaccurate.
|
|
|
|
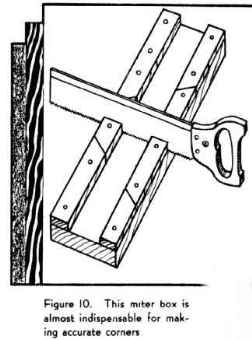
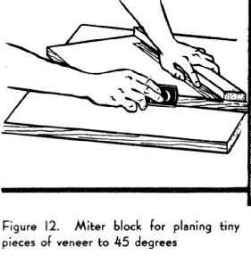
Two very useful devices which will help you avoid
this difficulty are illustrated in Figures 10, 11 and 12.
Both these devices may be easily made up at home or in
the workshop. One of them, Figure 10, is a common wooden
miter box adapted for inlay work. For this purpose the
channel must be very shallow and, to insure accuracy, the
saw cut must be no wider than the saw to be used. See the
working drawing, Figure 11. The other device is a miter
block. Figure 12, on which the angles are trimmed with a
plane. After the piece to be mitered is sawed to
approximate size in the miter box, it is placed on the
miter block and then trimmed, a hair's breadth at a time,
with a small plane laid on its side and run along the
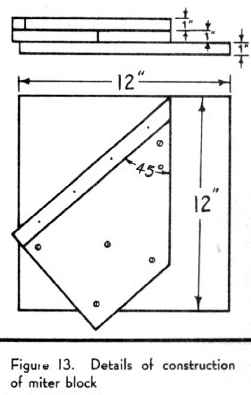
side of the block as shown. The block may be made of
almost any wood. as well as in any size hard wood will
give better service than soft wood. Figure 13 shows
details of the construction. The dimensions need not be
followed exactly but the degree angle must be extremely
accurate. |
|
When you have finished constructing these two aids, place your
7/16 in. border strip in the miter box and saw the angle, leaving
it again a trifle longer than called for in the drawing. Then,
using the miter block as already described, trim to exact size
with a small plane. In fitting the 7/16 in. border, the brads
maybe driven through the wood, because it is wide enough not to
split and dark enough to cover up the nail holes, which fill up
with glue when put in the press under pressure as will be
explained. After the first strip is fitted. follow with the
second, third and fourth until this border is completed.
There remains now only the wide outer border. Cut the pieces
for this border amply wide In fact, it is a good thing to allow
these pieces to extend fully 1/4 in. beyond the edge of the
design because, if the veneer slips when placed in the press, the
extra width is needed for trimming the work to the proper
dimensions. If the outer edge or the veneer is rough and uneven,
pay no attention to it because it will be trimmed away after the
assembling is complete.
GLUING ASSEMBLY TO
BACKING
Put on the wide border and glue it in the same manner as the
preceding borders; and when it is completed glue the paper tape
over the whole panel and remove the brads. The entire assembly is
now ready to be glued to the core or backing.The backing. may be
of almost any kind or wood, but plywood is much preferred to
solid wood because the latter is easily affected by temperature
changes and will soon warp. Plywood, on the contrary, is made up
of several layers or plies of wood, the grain of each running
crosswise of the others so that the tension of one layer
counteracts that of others and the wood remains flat under
extreme temperature and moisture changes. Plywood is generally
made up of an odd number of pieces. the center one being known as
the core, the others known as cross banding. For ordinary work,
three-ply wood is strong enough but for large articles, such as
table tops and the like, five and seven-ply wood is used. On the
latter, the cross banding is usually made of thin veneers, while
the core consists of a heavier piece of wood.
| The plaque we are describing is so small that a piece
of ordinary wood 3/16 in. in thickness will serve best as
core. Since it is desirable to back the plaque with a
piece of veneer, the result will be a three-ply plaque
with the marquetry on one side, an attractively figured
veneer on the other and the core in the center. If
walnut is used for the dark portions of the design, then
walnut should also be used for the reverse side. This
should be cut slightly larger than the given dimensions.
A simple press should be provided for gluing the inlay
design and the backing to the core because pressure is of
the utmost importance in a good glue job. The simplest
form of press is made of two heavy planks, pressed
together by ordinary iron clamps or cabinetmaker's wooden
clamps. See Figure 14.
|
 |
When carpenter's hot glue is used, both press planks must be
well heated. This may be easily done by running a hot flatiron
over their surfaces for five to ten minutes. The boards must be
thoroughly heated so that the glue will seep into the opened
pores of the veneers and become an integral part of them. After
the press is heated, remove the assembled inlay which is securely
held together by paper tape from the work bench and apply hot
glue to its under side. The side that is taped will be the face
of the plaque. Also apply glue to the core. Put the marquetry
face down on a sheet or newspaper, place the core glue side down
on it and apply glue to the other side of the core. Next apply
glue to the veneer that is to be the reverse side of the plaque
and place it on the core. Put the assembled plaque into the press
between several sheets of newspaper. After two or three hours,
the work may be removed from the press.
FINISHING THE PLAQUE
When no facilities are available for using hot glue or for
heating the press boards, casein glue may be used. This is a cold
water glue that comes in powder form and is readily mixed. It
requires no heat; when properly applied, it forms an inseparable
joint. It does not require so much pressure as hot glue but must
remain in the press overnight. Casein glue is waterproof and for
that reason is widely used in airplanes and boats.
The plaque may now be trimmed to the correct outside
measurements. The outside edges are squared off to conform with
the lines or the inner panel, the rough parts sawed off and the
rest planed down to the proper size.
For a simple finish, sandpaper the panel with No. 1 sandpaper
or No. 00 garnet paper until entirely smooth. Always rub with the
grain. Apply one coat of white shellac and the following day rub
down with No. 00 steel wool. Then apply another coat of white
shellac and, after waiting overnight, again rub with No. 00 steel
wool, this time dipping the steel wool in oil to prevent
scratching. wipe with a dry rag and finish with furniture wax if
you wish. This finish is intended solely for use on the first
little experimental plaque; a higher grade finish is described in
a later chapter.
FURTHER STEPS IN
MARQUETRY
 |
The problem of marquetry being understood, we shall
take up another project which illustrates two advanced
steps, shading of veneer and insertion or small pieces of
veneer in cardboard to save veneer. The project is the
urn shown in Figure 15. The steps of construction are
practically the same as those employed in making the
small plaque previously described. Briefly, a full-sized
design is drawn on paper and then traced on the work
board or bench. The veneers are selected and then cut to
approximate sizes. The design is traced on them and then
sawed out accordingly. Individual parts are then
assembled temporary, taped together with paper as before
and finally glued to a suitable core.
|
Three varieties of wood are needed for this design. The urn
itself is best cut from light-colored, the background is cut from
contrasting darker wood; and the small strip of wood that
represents the part of the urn between the rim and the scalloped
portion, is cut from a third color.
As the attractiveness or this design depends upon color
contrast rather than grain design, it is advisable to arrange the
veneer panels so that their grains run all in one direction. This
will make the scraping and sanding operations much easier.
| As in the first project, all the veneer panels used
may be sawed in a single operation after taping them
together; but in order to avoid waste in sawing out the
small central part of the urn, we shall resort to a
"wrinkle". Cut a piece of veneer just large
enough to cover the central part or the urn on the
drawing. Then select a piece or cardboard or the same
thickness as the veneer and trace the outline of the
small piece on the cardboard and out that section out.
Now place the veneer piece in the Cardboard and place the
whole assembly between the two large panels of veneer,
taking care that the small panel covers the part or the
drawing for which it is intended. The cardboard may now
be trimmed to the size or the other panels as in Figure
16 and the whole edge-taped and sawed. All parts of the
pattern must be sawed out independently that is the lid,
handles and foot must not hang together. Every line shown
in the drawing must be sawed clear through, as must each
of the short lines that run down from the numerous
scallops in the center of the urn. When glue is forced
into these fine cuts they will show on the light-colored
wood like pencil marks. Fine saw cuts like these are
often employed to indicate wrinkles in cloth or character
lines in a portrait. |
 |
 |
One of the special features of the urn is the
shading. This makes the bowl appear to stand out in
relief. This shading is obtained artificial by scorching
the veneer in hot sand. The worker should experiment with
a piece of waste wood before attempting to shade because
on by experience can he make the sand or how long to
immense the wood in the sand. The scorching is done by
placing sand in a pie plate and heating it on the stove.
When the sand is hot enough to scorch the wood, place a
small piece of veneer in the sand and allow it to darken.
Remember that scraping and sanding will lighten the
color, so that it must be scorched somewhat darker than
desired in the finished product. A pair of tweezers will
be round helpful in holding very small pieces, as in
Figure 17.
|
When some proficiency has been acquired by shading bits of
scrap veneer, take the pieces which have been cut for the urn,
and shade them as illustrated in Figure 15.
When the plaque is assembled, a border can be placed around it
similar to the one used in the first project; or a new border may
be devised after reference to the section of this booklet which
treats borders separately.
 |
Our next pattern, Figure 18, demonstrates a new
method of sawing and fitting This star is made up of
alternate light and dark wood on a background of
contrasting color. The grain in the four separate panels
that form the background may all run in one direction or
may be matched in a grain pattern. Neither plan should
present any difficulty and the choice is a matter of
personal preference. The method of sawing out the star is
entirely different from previous projects, as the various
triangles are neither cutout separately or sawed from a
pad of so many light and dark layers. Select a light
strip and a dark strip of veneer, each 1/4 in. wide (this
being the height of the triangles) and glue them together
side by side to make a two-color band. After the glue
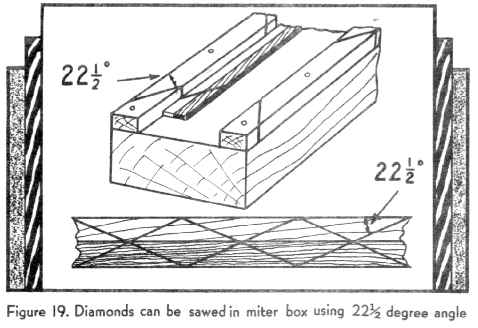
sets, place them in the miter box and saw them into
diamond shaped sections, as in Figure 19, each diamond
composed of a light and a dark triangle |
| The angle at which the diamonds are sawed is 22-1/2
degrees. This angle must be laid out in the miter box
with extreme care as a flawless fit depends upon the
accuracy of this angle. The slot in the miter box must
also be cut very neatly and just wide enough to permit
the saw to fit snugly in the slot; if it is loose the
results will not be good. To saw the diamonds properly,
drive a nail into the channel of the miter box to act as
a stop, then push the strip of wood into the miter box up
to the nail and saw it off; then advance the strip again
to the nail and saw again, repeating the process until
the entire strip is finished. |
 |
All diamonds will then be of uniform size and shape. When the
diamond sections are all cut out, assemble them temporarily; if
they fit properly, touch their edges lightly with glue and press
the pieces together. Next glue paper over the face of the star to
hold the pieces together and place the finished star on the
panels that are to form the background. With a hard pencil or
other sharp instrument trace the star's outline on the background
veneer and cut out the design with a knife. A knife is better
than a saw in this instance because a saw has a tendency to waver
and the slightest deviation from the straight line will show in
the finished work. A knife, if used as described earlier, will
cut straight and will enable you to cut the sharp corners so
necessary in this particular design. Finish with a border as
previously explained.
 |
This project leads us into some work of truly
artistic nature. Pictures in Wood, as they are known, are
effective and decorative and may be used for adorning
serving trays, table tops and many other pieces.
Beautiful scenes maybe portrayed in this way and the
possibilities of pictorial marquetry are limited only by
the artistic tastes of the craftsman. The Winter
Landscape, shown in Figure 20, with its trees in the
foreground and snow-capped mountain peak in the distance,
furnishes a fine example of picturesque simplicity.
The picture requires a careful selection of wood as
well as special choice of figure. The varieties of veneer
best suited to the objects in the picture are indicated
in the drawing. Substitutes may be used, of course,
provided they are effective.
Patterns of this sort may be made in two ways. The
various veneers may be laid on top of each other and
sawed out all at one time as we did in the first two
projects or the individual parts may be sawed out
separately. If the veneers are sawed out together, we end
with enough pieces to make as many complete pictures as
there are veneers used but since each part of the picture
is sawed out of so many differently-colored veneers, the
resulting pictures would all have different color
combinations. One side would have the required light wood
for the sky and snow and dark wood for the trees, while
another would have a black sky and light colored trees.
With a little ingenuity these odd combinations can be
employed to represent a night scene or other imaginative
title best fitted to the particular color scheme of the
picture.
|
If only one picture is desired, there is no need to cut out a
number of full sized panels because the unnecessary parts so
obtained are sheer waste. In such a case it is best to saw out
each part of the picture separately from the particular wood
intended for that part. This method also allows individual
selection of each piece of veneer for special grain or shading.
We may, for example, select a burly piece of veneer to represent
the trees, while for the sky we may choose straight grained or
wavy wood. This subject is treated a little more fully in a later
section of the book, under Choosing the Proper Grain
The craftsman's judgment must dictate where to begin the
inlay. In some cases it is best to start at the top, while in
others it may seem more practical to start at the bottom.
Geometrical designs are easier if we begin with the center piece
and then work outward.
For this project we shall begin at the bottom. After you have
laid out the design full size on the work bench, it will be found
practical to nail a few strips of wood temporarily around the
outline of the picture to form a frame. When the veneers are
fitted onto the drawing they may then be pressed snugly into the
corners or against the sides of the frame and no matter how many
times the pieces are removed and reassembled for fitting they
will always fall into their proper places. With the frame as a
guide you need not be so careful to place the pieces exactly on
the lines of the drawing.
 |
Begin by sawing out a piece of mahogany of the ground
in the lower right-hand corner of to the exact curve the
picture. Now saw a similar piece of oriental wood to
represent the piece or ground in the lower left-hand
corner. But in order to obtain an exact fit where the two
pieces of ground meet, lay the left-hand piece underneath
the the right-hand one and trace the outline of one upon
the other as shown in Figure 21. Then saw off accordingly
and press both pieces back into the lower portion of the
temporary frame. Next, take a piece of walnut veneer from
which to make the smaller tree on the lower right side of
the design. This piece must be large enough to reach
right down into the corner of the frame. Trace the
outline of the tree onto the veneer, using for this
purpose the original full sized drawing and tracing
through ordinary carbon paper. Before sawing off the part
where the trees meet the ground, slide the veneer
underneath the ground and again trace around the outline
of the ground. Saw off this lower portion and put it back
into the frame. If carefully traced and accurately sawed,
there is no reason why the parts should not fit together
perfectly. |
FINAL STEPS TO COMPLETE
THE WORK
Follow this with the portion showing the mountain
but without the snow cap. For this use a piece of veneer large
enough to fill the entire bottom of the picture. Trim it so that
it will fit correctly into the frame. Now trace the outline of
the mountain top along the snow line and sky line onto the
veneer. Continue the outline right through the space which will
be taken up by the trees. Now slide the veneer underneath the
three other parts already in place and after having pressed it
down into the frame, trace the outline of the small tree and the
ground onto it and saw off on the traced line.
The snow-capped peak completes the main part of
the scenery. It will not be necessary to use a large piece of
veneer for this part. A strip just large enough to cover the
entire snow portion will be sufficient. Trace from the original
drawing the upper outline of the snow cap. Then slip the veneer
underneath the other part of the mountain, which lies assembled
in its proper place. Trace its outline and saw it out in the same
manner as the other parts were fitted.
For the Sky, a light-colored piece of avodire has
been chosen. In the same way that you fitted the other parts into
the lower part of the frame, cut the sky to fit into the upper
part of the frame and to extend low enough to overlap the other
parts of the inlay. Fit the sky well into the upper part of the
frame and underneath the other assembled parts. Trace their
outlines onto the sky, saw it out and reassemble.
The picture is now complete except for the two
large trees. Draw these on a straight piece of veneer and saw
them out independently. Then place them in their proper position
on top of the assembled inlay and trace their outline onto these.
It might be mentioned that dyed walnut veneer,
used for the tall tree, can be obtained already dyed. Aniline
dyes are used for dyeing wood, but since veneers can be obtained
commercially in all colors, it is unnecessary to attempt to color
them.
The various pieces may now be taken apart and
sawed out, then reassembled and the trees inserted into the
openings thus made. When the entire picture is completed, paper
is glued across the design to hold all or the parts together.
INLAY BANDING ADDS
ATTRACTIVENESS
The temporary frame may now be removed and a
suitable border fitted around the inlay. Just what pattern to use
is optional and the method of fitting such banding has already
been described. The outer border may be of any size, depending on
the desired over-all size of the picture.
 |
Undoubtedly nothing sets off inlay more beautifully
than a border or multi-colored woods of varied design.
Simple banding, consisting of light and dark colored
strips, as used in the first plaque, may be made up or
individual pieces, as the design is built up. More
elaborate banding, however, can be made up beforehand and
then handled as a single piece. Such patterns are made up
of many pieces or wood glued together into one solid
board and then sliced off across the edge of the
laminations as in Figure 22. |
| To saw off a strip 1/28 in. thick is not an easy
matter and requires the use of an electric rip saw with a
special small blade. As most amateurs do not possess one
of these saws. They must devise other means for making up
banding. When the necessary tools are not available it is
possible to make up many attractive designs from ordinary
light and dark strips of veneer, left-overs from previous
inlay jobs being suitable for the purpose. The veneer is
sliced with the grain with a sharp knife and straight
edge. The strips are then laid flat on the table and
glued together side by side in the form of the pattern
desired. With just a piece or light and dark colored
veneer to work with, the borders shown in Figure 23 A to
D can be made up. |
|
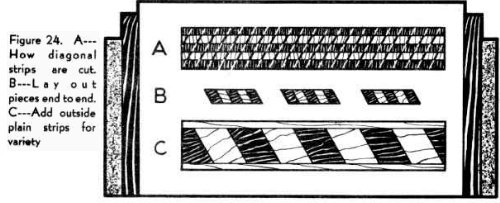
Then there is a method of making up a diagonally striped
center strip from sections cut from an alternately colored band
as shown in the second of these illustrations. The light and dark
strips are glued together as in Figure 24A but for convenience
additional strips may be added. When completed, this wide banding
is then sawed diagonally into strips 1/16 in.or 1/8 in. wide, as
desired and as shown by the diagonal lines in Figure 24A. Laid
end to end, these strips form a continuous band of diagonally cut
checkers as shown in Figure 24B. By placing this band between two
other strips, we can make up a very attractive border, as in
Figure 24C. By combining various colored woods we can improve
this design and obtain very beautiful effects.
It is not likely that the amateur will spend much time making
up more elaborate banding than that shown above, since it may be
purchased already made up. It is available in many sizes and
patterns and is so inexpensive that it does not pay to go to the
trouble of assembling hundreds of little pieces. Also the
manufactured article usually contains woods of select grain and
rare beauty that would be difficult to purchase in small
quantities. Nevertheless, some workers will want to make the more
intricate banding, hence, we shall describe as briefly as
possible the method of making up such banding.
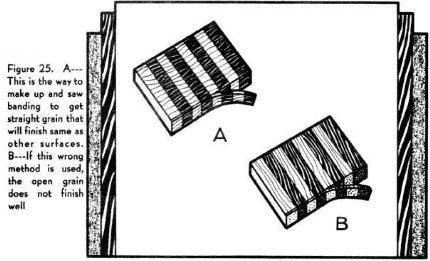 |
As already explained, the various combinations of
wood are glued together into one block and then sliced
off into strips of the desired thickness. It is
imperative that the pieces be placed together so that the
banding, when finished, will not show any open grain. If
any of the small pieces were sawed off across the grain,
these pieces would stand out from the others and would
not take a good finish. Such an error might spoil the
entire effect of the banding. Figure 25A and 25B show
very clearly the right and wrong way of laying out the
pieces. |
To complete the pattern, the row of alternately colored pieces
is sandwiched between two or more layers of veneer. The veneer
used should be of contrasting color and the grain must run in the
same direction as the grain of the small segments. If several
layers are used on each side, they should vary in thickness to
provide variety in the finished banding. After it is glued and
thoroughly set, the completed block is sawed into veneer like
strips, about 1/28 in. thick, as in Figure 22. Great care must be
taken in gluing, as open joints will show up as soon as the
strips are sawed.
For purposes of illustration, the pattern is greatly magnified
here but some of the pieces are, in reality, no larger than
splinters. Combinations of very small pieces are desirable
because the more delicate the inlay the richer the appearance of
the finished article.
True Inlay Differs from
Marquetry
So far, we have spoken of only that branch of
inlay work known as marquetry, which in reality is not true inlay
because it involves merely piecing together different-colored
bits or veneer. True inlay, on the other hand as the word
implies, is the process of fitting a veneer pattern into a recess
of the same shape, routed out of a matrix.
Marquetry has so many advantages over inlay,
especially in forming complicated patterns, that it has quite
replaced the more difficult work of inlaying except in the case
of inlaid banding, which is still generously employed to
embellish fine cabinet work. We also find inlay still used
extensively in musical instruments on which mother-of-pearl,
ivory and bone are often used to produce an artistic finish.
To make an inlay, we route out a pattern to the exact size of
the piece to be inlaid and glue the latter in the routed place.
Although a straight line is easily made, routing of odd shapes is
considerably more difficult because the outlines must be cut very
accurately and the entire routing must be done to exactly the
right depth. Various types or chisels and an electric router are
usually employed for this work. But, since machinery is out of
reach of the average beginner, it would be a waste of time to go
into the details of inlaying intricate figures. Instead we shall
devote some space to plain inlaid banding, which will remain in
favor for a long time.
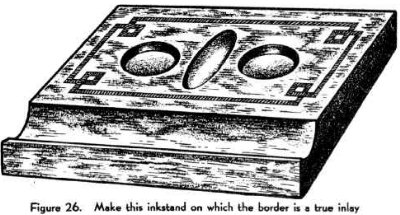 |
In the inkstand shown in Figure 26, a simple border
design turns a plain block or wood into a work of art.
The stand is made of a solid block of walnut or mahogany
not less than 1 in. thick and measuring 6 in. by 8 in.
The two glass inkwells purchased at a 10-cent store fit
the two holes in the block. These holes must be drilled
with an expansion bit; their diameter depends upon the
inkwells used and they can be about 1/4 in. deep. |
Between the inkwells a shallow trough is gouged out to hold
pins, paper clips, etc. Along the front of the inkstand a groove
1-1/4 in. wide is formed to hold pen-holders and pencils. This
groove may be roughly hollowed out with a wood rasp, then
finished with sandpaper wound around a piece of pipe or round
piece of wood such as a section of broom handle.
| The desired banding having been purchased or made up
as explained in the special chapter on that subject, the
design to be inlaid is drawn on the block of wood with
pencil. This design calls for a 3/16 in. border placed
1/4 in. from the edge. Because of the special corner
design, the long lines of banding run to within 7/8 in.
of the end only. Exact dimensions of the design are shown
in Figure 27. |
 |
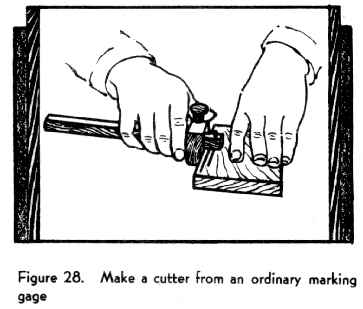 |
If the routing is to be done by hand, a routing gage,
as pictured in Figure 28 is employed. Such a gage is not
available ready made but an implement such as a common
marking gage or a similar tool called a scratch stock may
be modified to hold a knife blade. This blade, like all
wood-working tools, must be razor sharp and must be
attached to the gage so that the depth of its cut is
adjustable. After settling the gage to make the first
cut, 1/4 in. from the edge Of the block and of a depth
equal to the thickness of the banding, cut along the
exterior long lines. Then reset the blade to cut 7/16 in.
from the edge which is 1/4 in. plus the 3/16 in. width of
the banding and cut along the inner long lines. The short
pieces at the corners must be cut by hand, a sharp pen
knife being satisfactory for this purpose. Run knife
along a straight edge, making a shallow cut first. Then
go over it, cutting to the full depth. Be sure to cut
accurately at the corners. |
If no routing tool is available for making the long cuts and
it is inconvenient to make one as directed, a sharp knife and a
straight edge may be used but the straight edge must be clamped
securely in place and the cut made very carefully lest the knife
veer in the direction of the grain of the wood. When lines are
drawn parallel with the grain, it is well to draw the knife with
the grain rather than against it.
A hand router has been placed on the market which is of great
help in routing out narrow strips for banding. This small device
works on the principle of a plane; it may be fitted with blades
of various widths and is adjustable so that a cut may be made to
any desired depth. With this tool it is not necessary to cut
straight lines first, and then lift out the waste portion between
the because the router does both jobs at once.| It is equipped
with a gage for use in following the edge of aboard curved edges
as well as straight ones may followed. The above router has
another important advantage. The strip that is routed out is
ejected from the center like the shavings from a plane. If care
is taken not to break this strip, it may be stained a different
color and inlaid again into the same groove from which it was
taken, insuring an absolute fit. Or a strip may be routed from
another piece of wood and used as banding.
If, however, such a router is not available, the waste portion
between the lines must be lifted out by means of a narrow chisel,
after all lines have been traced with cutting gauge and knife.
Great care must be taken here to lift out no more than the
thickness of the banding to be inlaid. In fact, it is good
practice to make the groove a little shallower than necessary
because if any banding protrudes above the surface of the board
it can easily be sanded down level. If, on the other hand, the
groove is routed out too deep and the banding lies below the
surface, it is difficult to raise it.
Go to Wood Inlay Part II
Book reviews on marquetry with
images